Getting Started
Ever wanted to be able to control a device with simple English?
Look how easy it is with the Open Source Timer and Timer Description Language:
Simple Example
A: enable channel 1 on the 1st, 5th, 8th day every month

More Complex Example
a: enable channel 1 for 30 minutes every 2 hours
B: enable rule a for 1 day every every second day

Rules
To the right you’ll see a very simple rule in Timer Description Language. Click on the ‘Schedule’ tab to see the output from the rule.
Notice that this simple rule is made up of a number of parts.
[rule name]: [action] [condition]
A: enable channel 1 for 30 minutes every 2 hours
There are different recipes that can be followed in TDL but each of them follows this basic syntax of rule name, action, condition.
Example Rule
A: enable channel 1 for 30 minutes every 2 hours

Rule Names
Rule names can contain only underscores, capital and lower case letters and numbers and must start with a letter.
- If the rule starts with a capital letter eg.
MyRulethen it will be enabled on startup. - If the rule starts with a lower case letter eg.
myRulethen it will be disabled on startup.
Rule names are not case sensitive so myrule and MyRuLe are considered the same rule
Actions
Actions describe what should happen when a rule changes states.
Here are two example actions:
enable channel 1
disable rule myRule
Each action follows the format
[enable/disable] [target]
The first word must be either enable or disable. This determines what the target will do when the rule is ‘on’. For example, have a look at the following rule.
- enable - channel or rule is on by default
- disable - channel of rule is off by default
A: enable channel 1 for 30 minutes every 2 hours
This rule turns channel 1 on for 30 minutes every 2 hours. For the remainder of the two hours the channel will be off. You can see this rendered on the schedule tab above.
The compliment to the enable keyword is the disable keyword. If we replace enable in the above rule with disable we get the following result.
A_bar: disable channel 1 for 30 minutes every 2 hours

Now we can see that the channel turns off for 30 minutes out of every 2 hours. For the remainder of the two hours, the channel is on.
Enable Rule
A: enable channel 1 for 30 minutes every 2 hours
Disable Rule
A: disable channel 1 for 30 minutes every 2 hours
Action Targets
Action targets specify what the rule should affect when it changes state.
As mentioned in Actions, each action has the following format.
[enable/disable] [target]
The target is what will be affected when this rule changes state. The target can be either:
To target a channel just use the channel keyword followed by the channel id.
In future named channels will be supported. For now you can use variables.
The ability to target another rule means that multiple rules can be cascaded to form complex patterns.
Here’s an example of using a rule as a target.
a: enable channel 1 for 30 minutes every 2 hours
B: enable rule a for 1 day every every second day
Rule With Channel Target
A: enable channel 1 for 30 minutes every 2 hours
Rule With Rule Target
a: enable channel 1 for 30 minutes every 2 hours
B: enable rule a for 1 day every every second day
Channels
Channels are generally a switch that you’ll be able to turn on/off with the Open Source Timer board.
The Open Source Timer board Rev0 has four channels which can be referenced using channel 1 through to channel 4.
For more information about the channels on the OST board Rev0 see link.
Conditions
A condition is the meat of a rule. It describes when the rule should change states.
[rule name]: [action] [condition]
A: enable channel 1 for 30 minutes every 2 hours
The condition is broken up into three parts:
[interval] [period] [(optional) starting]
for 30 minutes every 2 hours starting at 1pm on 1/1/2018
The first part is the interval. There are three different types of intervals.
- for intervals eg.
for 1 minute - between intervals eg.
between 9am and 5pm - on intervals eg.
on the 1st, 5th, 10th
Intervals describe when the rule should be ‘on’ during each period.
The second part is the period. It describes the period over which the rule should be repeated. For example the period could be one day, 2 weeks, 1 day and 3 hours, etc.
One Shot Rules
The period can be omitted for one-shot rules. For example, the condition `for 6 minutes` will run for 6 minutes then never be activated again.
The last part is the starting part. It describes when the rule should begin.
TODO: write more about starting part and events
A: enable channel 1 for 30 minutes every 2 hours
Conditions: for
For conditions are the simplest type of conditions. They specify how long the rule should be on for in their period.
Take a look at the following rule and it’s output schedule.
A: enable channel 1 for 15 minutes every hour

For conditions are always aligned with the start of each period. This is demonstrated in the schedule above where the channel is on for
the first 15 minutes of every hour and off for the last 45.
For Condition Example
A: enable channel 1 for 15 minutes every hour
Conditions: between
Between conditions specify an active interval for the rule. This interval is repeated each period.
Take a look at the following between rule and it’s output schedule.
A: enable channel 1 between 9am and 5pm every day
Between conditions have one of the following syntaxes:
between [start time] and [stop time]
between [second/minute/day/etc] [start] and [stop]
between [start] and [stop] [seconds/minutes/days/etc]
It's important to include an every part in your between condition rule unless you want a one-shot rule.
Here's an example of what not to do.
A: enable channel 1 between 9am and 5pm
A number of examples of between condition rules are shown in the code bar on the right.
Between Condition Example 1
A: enable channel 1 between 9am and 5pm every day
Between Condition Example 2
A: enable channel 1 between the 2nd and 4th week every month

Between Condition Example 3
A: enable channel 1 between second 3 and 70 every two minutes

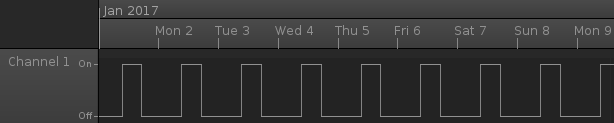
Conditions: on
On conditions specify a list of intervals during which the rule will be active.
Take a look at the first example on the right (On Condition Example 1) and it’s schedule.
In this example the rule is active on the 1st of the month. That is, it’s active from midnight on the first of every month until midnight on the 2nd of every month. It will also be active on the 5th of every month. That is, it will be active from midnight on the 4th of every month until midnight on the 5th of every month. Finally, it will also be active on the 8th of every month.
Note that the list must not contain the word and. For
example on the 1st, 5th and 8th will not work.
On conditions have one of the following syntaxes:
on [list of numbers] [second/minute/day/etc.] [(optional) of]
on [second/minute/day/etc.] [list of numbers]
Here are some more examples:
on minute 1 every ...
on hour 1, 2, 3, 4, 5 every ...
on month 6, 10 every ...
on the 1st, 10th day every ...    ** day is not required, it's implicit here
on the 1st, 10th every ...        ** same as above
on the 3rd of every ...           ** again, day is implicit so we don't need it
on the 100th second every ...
on the 100th second of every ...
TODO: add support for on the first 5 seconds, on the last 10 seconds.
Weeks is not currently supported. Eg. on the 2nd week will not work.
On Condition Example 1
A: enable channel 1 on the 1st, 5th, 8th day every month
On Condition Example 2
A: enable channel 1 on minute 8, 29, 55 every hour

On Condition Example 3
A: enable channel 1 on the 2nd, 4th week every month

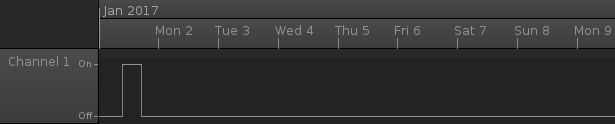
Events: starting on
Timer Description Language supports events. Events can be triggered from different inputs such as a reed switch, light sensor or just a pin level changing. For example, you could attach a water moisture sensor which triggers an event on the Open Source Timer if moisture drops below some level. When the Open Source Timer receives this event it could activate a sprinkler for 1 hour.
Syntax:
[rule name]: [action] [condition] starting on event [event name]
A: enable channel 1 for 1 hour starting on event moistureSensorDetectorLow
The first example rule on the right shows the situation described above. The markers in the graph
which look like this  , show when events occurred.
Note that rules starting on an event don’t have to be one-shot rules. For an example see Starting On Event Example 2 on the right. Notice how every time the event is triggered the rule ‘resets’.
Starting On Event Example 1
WaterPlants: enable channel 1 for 1 hour starting on event moistureSensorDetectLow

Starting On Event Example 2
Align: enable channel 1 for 1 hour every 2 hours starting on event reedSwitch

Events: starting after
Events can also have a delay built into them. In case you want to start a rule a fixed amount of time after some event fires.
Syntax:
[rule name]: [action] [condition] starting [period] after event [event name]
A: enable channel 1 for 1 hour starting 30 minutes after event  moistureSensorDetectorLow
Strange things can happen if events with delays overlap. This needs more looking into.
Between Condition Example 1
WaterPlants: enable channel 1 for 1 hour starting 30 minutes after event moistureSensorDetectLow
